WooCommerce is like a special tool for WordPress websites that helps you turn your regular site into a cool online store. With WooCommerce, you can easily add and organize your products, set up a shopping cart so people can buy stuff, and choose how you want to get paid, whether it’s through PayPal, credit cards, or other ways. You can also decide how you want to send things to your customers. WooCommerce lets you customize your online store to look just the way you want, and you can keep an eye on how your store is doing with simple reports. Customers can make accounts, check their past orders, and do other stuff too . If you need extra features, there are lots of add-ons you can use to make your online store even more awesome one off them will be CUSTOM REGISTRATION FORM with USER REGISTRATION plugin for Woo Commerce.

WOO COMMERCE ADD-ON FOR CUSTOM REGISTRATION FORM:
The WooCommerce add-on helps you connect your registration forms with WooCommerce, so people can see their shopping details in their account. It also lets you use the registration plugin’s info in the checkout and account pages on WooCommerce.
To add this feature to your WordPress site, follow these steps:
1. Install the WooCommerce Add-on:
– Buy the User Registration – WooCommerce add-on.
– Download the add-on zip file from your WPEverest account page.
– In your WordPress Dashboard, go to Plugins > Add New, upload the file, and click Install Now. Also, make sure to have User-Registration and WooCommerce plugins installed.
2. Setup and Configuration in User Registration:
– Activate the installed add-on in your plugin list.
3. Display User Registration Fields in WooCommerce Account:
– Now, your users can see their registration info in their WooCommerce account.
4. Replace WooCommerce Login and Registration:
– The add-on lets you use User Registration form instead of the default WooCommerce login and registration.
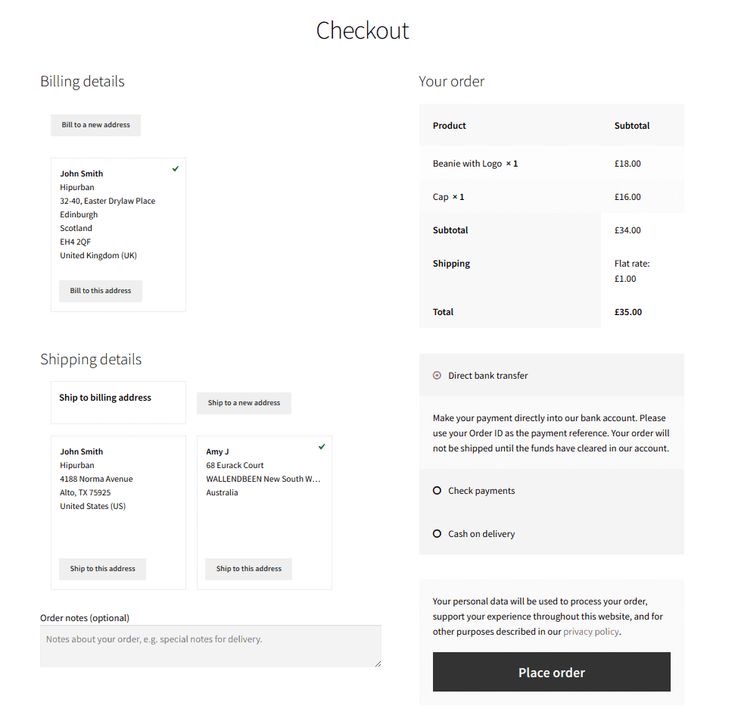
5. Integrate User Registration Form in WooCommerce Checkout:
Users can use their registration details during the WooCommerce checkout process.
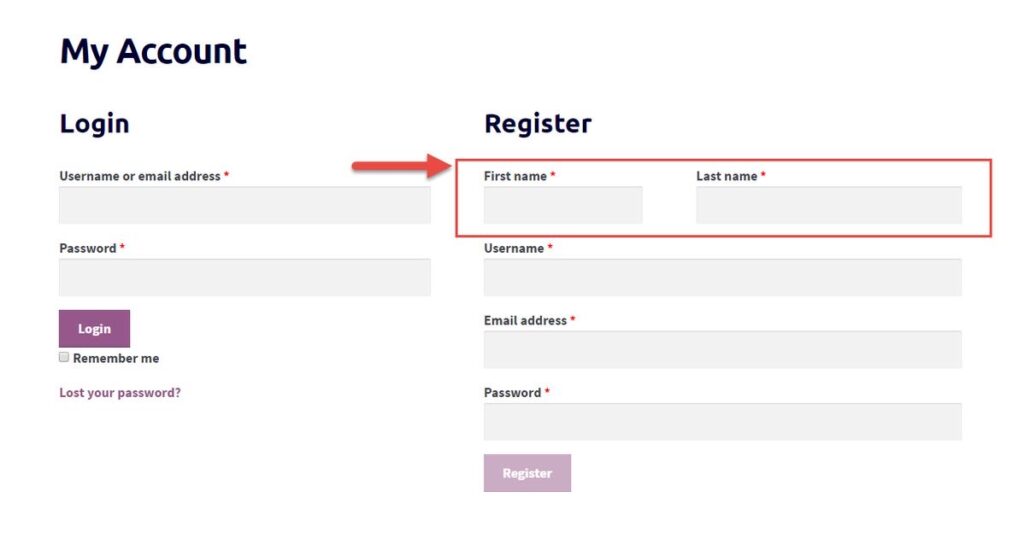
After following these steps, your site will have these useful WooCommerce features seamlessly integrated.
THE ADD ON AND ITS FEATURES:
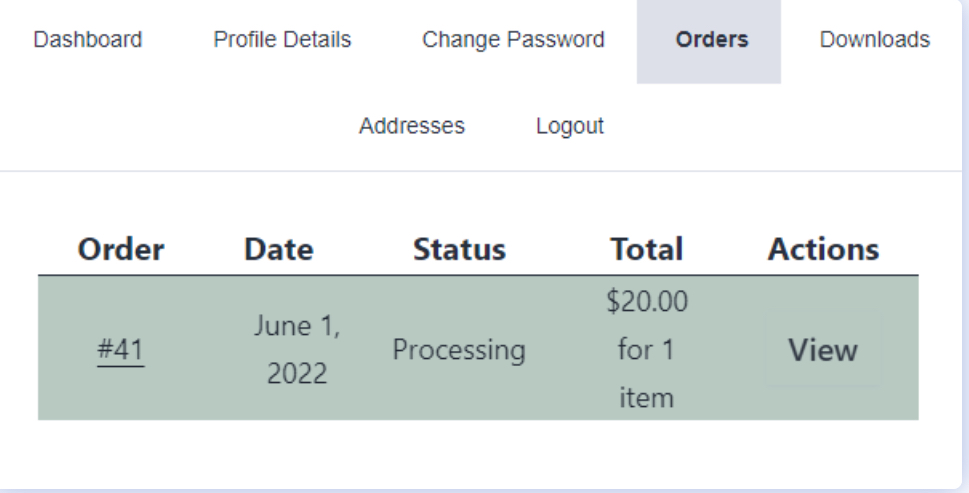
Once you turn on this add-on, you’ll find some new tabs in your WooCommerce “My Account” area. These tabs will let you manage things like your orders, downloads, and addresses, all in one place.
Here’s a quick rundown of what each tab does:
- Dashboard: This is your home base for managing your account stuff. You can update your profile details, change your password, and get a quick overview of your orders and downloads.
- Profile Details: This is where you can see and edit your basic info like your name, email, and phone number.
- Change Password: If you need to update your password, this is where you do it.
- Orders: This tab shows a list of all the products you’ve ordered in the past. Handy for keeping track of your shopping history!
- Downloads: If you’ve bought any digital products, you can download them here. Just click on the file you want,and it’ll start downloading.
- Address: This tab lets you manage both your billing address (where you get your bills sent) and your shipping address (where you want your products delivered). You can easily edit either address by clicking the “Edit” button.
- Logout: When you’re done managing your account, click this tab to sign out.
Bonus Feature: This add-on also lets you include billing and shipping address fields right on your WooCommerce registration form. This way, new customers can enter their addresses right when they sign up, saving them time later
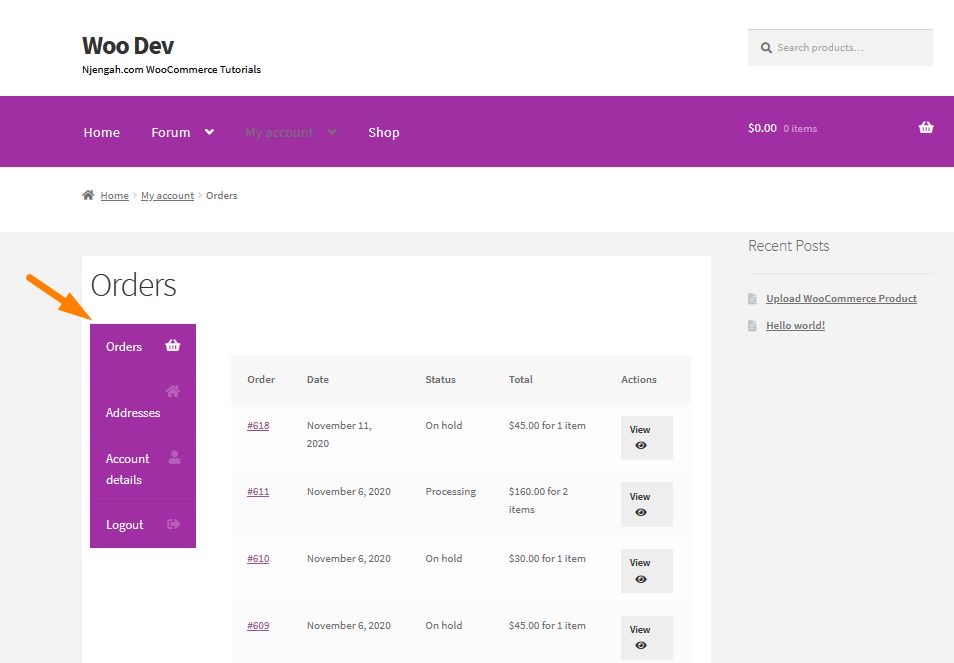
After clicking on the Edit link, you will be shown an edit form. And click on the Save Address button to update your address.
MY ACCOUNT PAGE CONFLICTS:
If you’re using the User Registration add-on and want it to be the main “My Account” page, you might run into a little hiccup.
Here’s the issue
There are two different “My Account” pages trying to be in charge the one from WooCommerce itself and the one from the User Registration add-on. This can cause the “Orders” tab to show an error.

Here’s how to fix it:
Go to the WooCommerce settings area by clicking WooCommerce > Settings.
Find the Advanced tab and click on it.
Look for a setting called My account page.
Change the setting to User Registration Account Page.
Don’t forget to click the Save Changes button to make it stick!
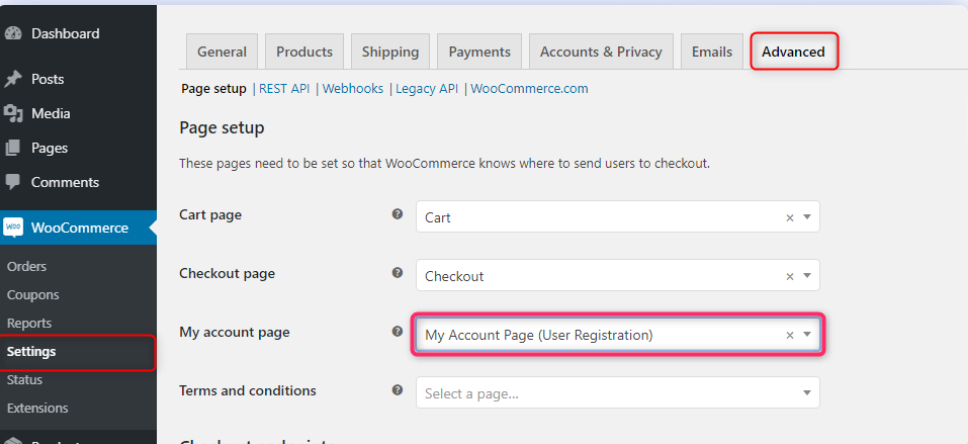
Once you’ve done this, the conflict should be resolved, and the User Registration Account Page tabs will work smoothly.
HOW TO INTEGRATE THE USER REGISTRATION FIELDS:
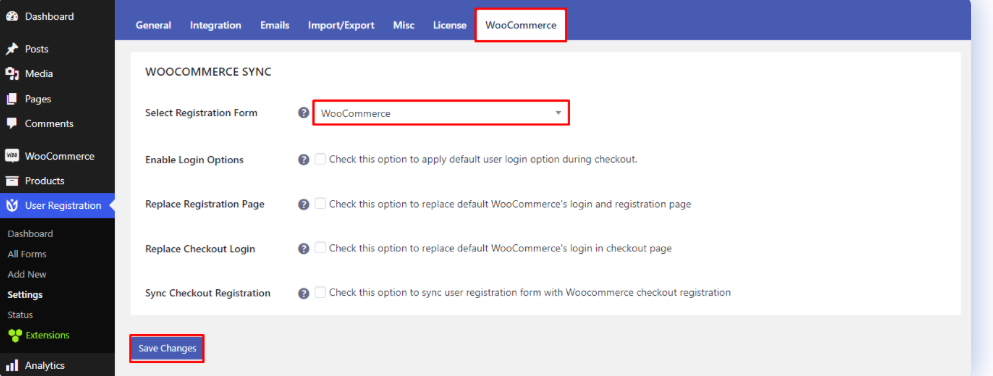
Navigate to the User Registration settings by clicking User Registration > Settings.
- Find the WooCommerce tab and click on it.
- Look for the setting called Registration Form.
- Choose the specific registration form that you want to use for this integration.
- Don’t forget to click Save Changes to make it happen!
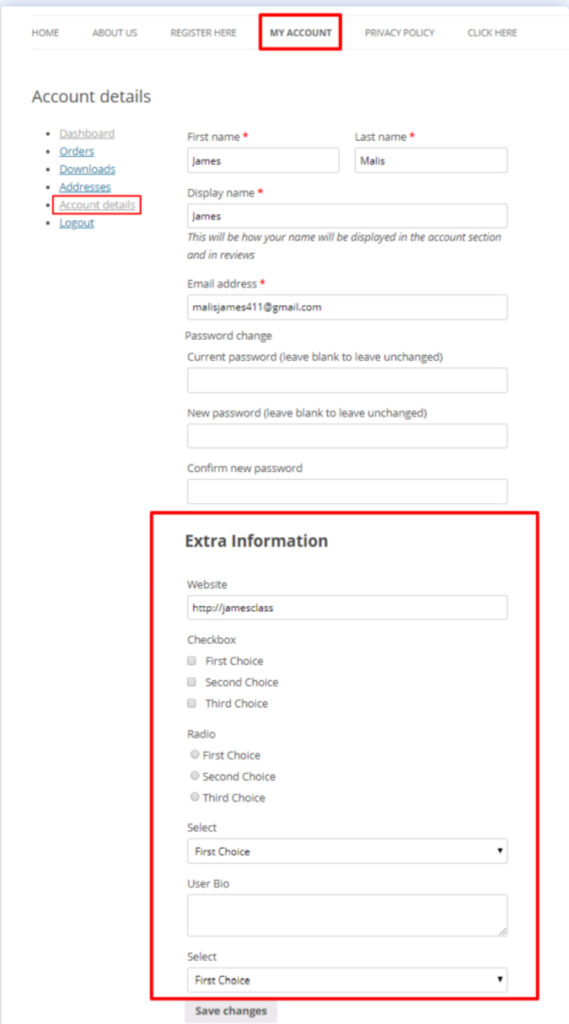
Once you’ve done this, the fields from your chosen registration form will magically appear on the “Account Details” tab of the WooCommerce My Account Page.
HOW TO SWAP OUT THE LOGIN AND REGISTRATION FORMS:
Want to use your User Registration forms instead of the default WooCommerce ones? No sweat! It’s a quick two-step process:
Step 1: Adjust WooCommerce Settings
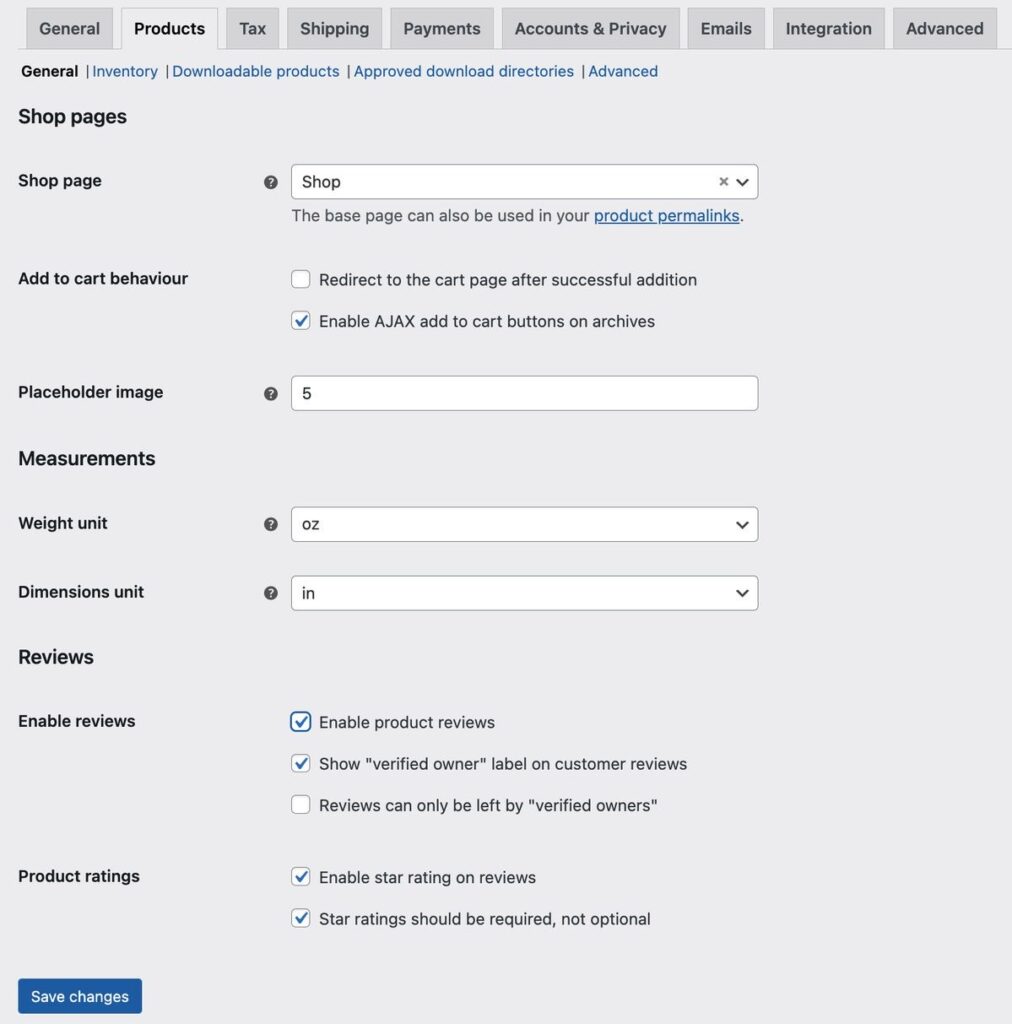
- Head to WooCommerce settings by clicking WooCommerce > Settings.
- Find the Accounts and Privacy tab and click on it.
- Look for the Account Creation section.
- Check the box that says Allow customers to create an account on the “My Account” page.
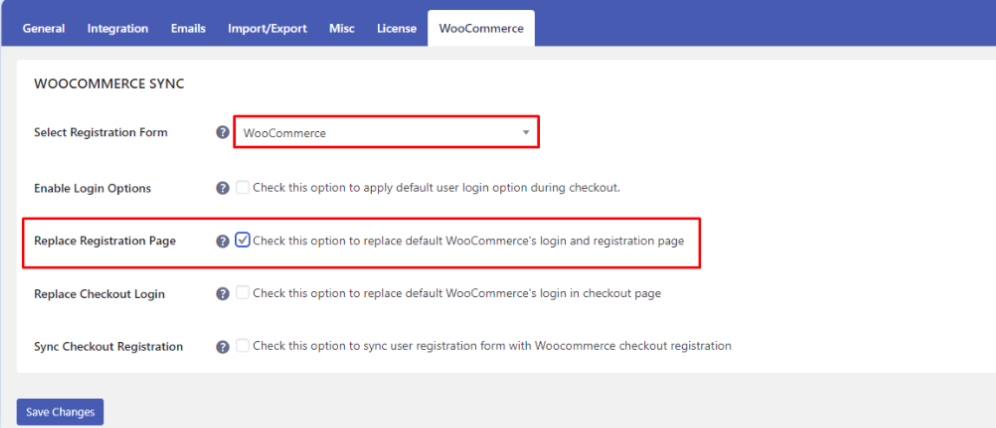
Step 2: Tell User Registration to Take Over
- Go to User Registration settings by clicking User Registration > Settings.
- Find the WooCommerce tab and click on it.
- Choose the specific Registration Form you want to use as the replacement.
- Check the box that says Replace default WooCommerce’s login and registration page.
- Click the Save Changes button to make it official!
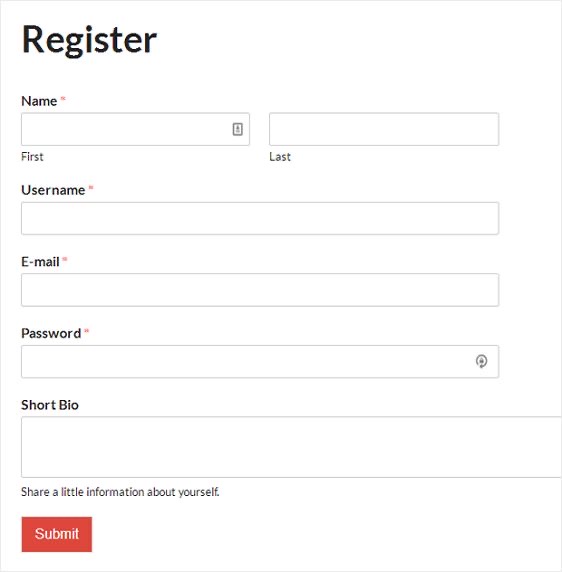
CUSTOM REGISTRATION FORM:
A custom registration form is like a unique entry ticket for a website. Instead of using a standard form, the site creates its own special form with specific questions or fields tailored to its needs. It’s like asking visitors for specific information that the site finds important or useful. So, a custom registration form is a personalized way for users to provide details when signing up, making the website experience more tailored to its goals.
HOW TO ADD THE REGISTRATION FORM TO THE CHECKOUT PAGE:
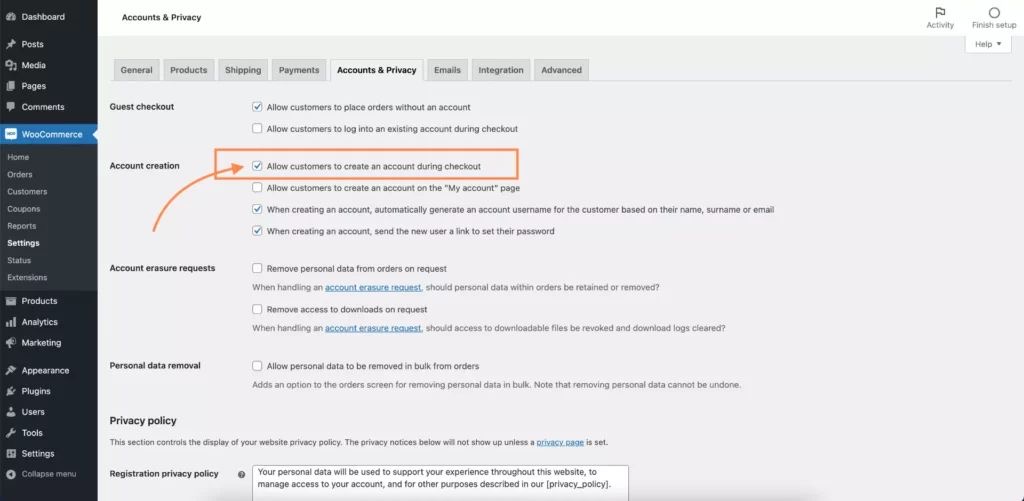
1. Turn on Account Creation During Checkout:
- Go to WooCommerce > Settings.
- Click the Accounts and Privacy tab.
- Look for the Account Creation section.
- Check the box that says Allow customers to create an account during checkout.
2. Sync User Registration with Checkout:
- Go to User Registration > Settings.
- Click the WooCommerce tab.
- Check the box that says Sync the user registration form with the WooCommerce checkout registration.
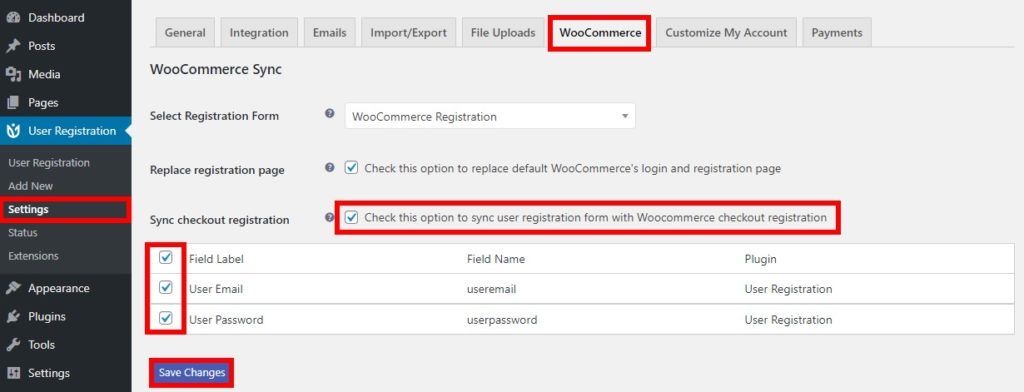
3. Choose Extra Fields (Optional):
- If you have extra fields in your User Registration form that you want to include in the checkout, you can select them here.
ENABLE LOGIN OPTIONS:
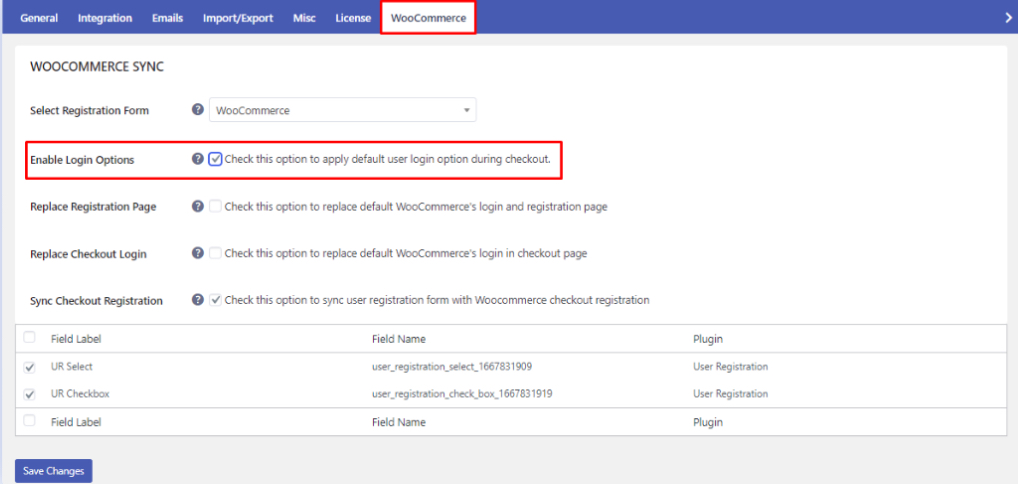
It Lets you use the login options you set in your registration form on the checkout page as well customers can use those same methods (like social logins or passwordless logins) to create accounts during checkout.
HOW TO INTEGRATE USER REGISTRATION FORM FIELD ON WOO COMMERCE SINGLE PRODUCT PAGE:
It Lets you add specific registration form fields to individual product pages. This can be useful for collecting additional information relevant to that product, like custom engravings or size preferences.
– How to do it:
- Go to Products > Edit for the product you want to add fields to.
- Scroll down to the Product Data section.
- Find the tab called UR Form and click on it.
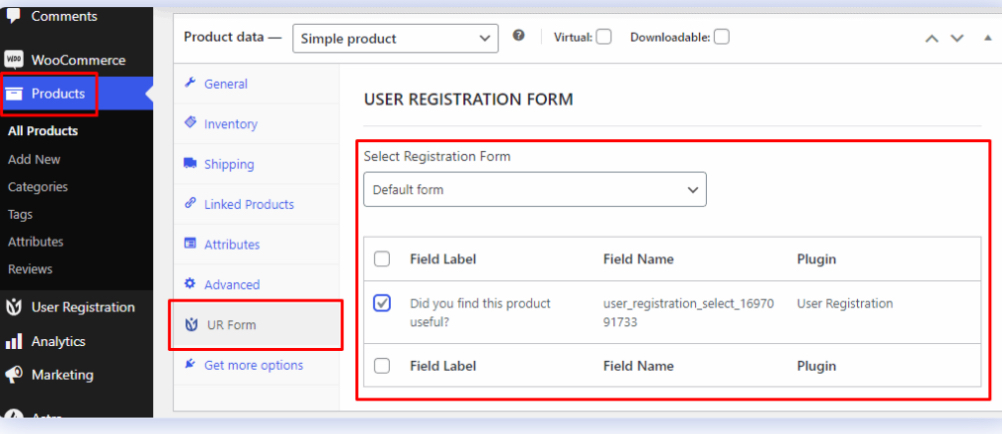
4.Choose the form you want to use and select the specific fields you want to display.
PLUGIN:
A plugin is like a small helper for your website or software. It’s a piece of extra code you can add to enhance or extend its functionality. Think of it as an app that you install on your phone to add new features a plugin does a similar job for your website or software, making it more powerful or versatile. It’s a bit like adding new tools to your toolbox each plugin is designed for a particular job, whether it’s helping with user registrations, adding cool visual effects, or handling online payments.
Think of your website or software as a kitchen, and a plugin as a specialized gadget you can plug in. If you want to make smoothies, you add a blender; if you want your website to have a contact form, you add a contact form plugin. It’s a way to customize and improve your digital space without having to build everything from scratch.

USER REGISTRATION PLUGIN:
A user registration plugin is like a tool for websites. It helps people sign up and create accounts on the site. Think of it as the key to access special features or content – without it, users can’t unlock the full experience. The plugin manages the process of collecting user information and creating accounts so that people can interact with the website in a personalized way.

CUSTOM REGISTRATION FORM WITH USER REGISTRATION PLUGIN FOR WOO COMMERCE:
Install and Activate User Registration Plugin
Begin by checking if the User Registration plugin is installed on your WordPress site. If not, install and activate it to enable its functionality. Think of this step like switching on a tool that helps with user registrations.
Configure WooCommerce Integration
Head to the plugin settings and find the WooCommerce option. Turn it on to create a smooth connection between the User Registration plugin and WooCommerce. This is like making sure two pieces of your website can work together seamlessly.
Create a Custom Registration Form
In the User Registration tab, click ‘Add Form.’ Think of this step as designing your own entry form. Customize it by adding fields like name and email. It’s as simple as dragging and dropping these fields where you want them.
Once you’re done, save the form, and you’ll get a short-code. Pop this short-code onto the page where you want your registration form. Now, when users sign up on your WooCommerce store, they’ll see and fill out this personalized form, making their experience better and helping you collect the specific details you need for your online shop.
Explore more:
https://wordpressguidance.com/2024/01/23/user-registration-and-their-add-ons/


